I’ve moved!

Hi, folks! I’ve moved to hosting my own site and all my yummy recipes can now be found at http://amandasapron.com

Yay! It’s so exciting! And don’t worry – if you’re a subscriber, you’ve already been moved over to the new site and haven’t missed a thing.  Thanks for reading!

Sweet Potato Chips

It is nearly fall.  Really, this just means I am excited for the return of pumpkin spice lattes and caramel pumpkin latte candles.  And of course, yummy sweet potatoes!  Between you and me, this is just a sneaky way to eat sweet potatoes outside of an official meal.

These are really easy and super healthy.  For those of you who are concerned about health or follow Bob Harper, you know he has published his book Skinny Rules, which gives 20 guidelines to help with overall health and wellbeing.  One of his rules is to say goodbye to white potatoes.  Though I did not usually keep white potatoes in my pantry, this was enough for me to embrace sweet potatoes and blue potatoes.  That combined with the fact that my household runs on chips – tortilla chips, pita chips, falafel chips, pretzel chips, oh my – inspired me to try baking a new, fresh twist on a chip.  And I love that it has very few ingredients!

Sweet Potato Chips

makes 2-3 servings

2 medium sweet potatoes

2T olive oil

1/2t paprika

1/2t chili powder

1/2t sea salt

1/4t cinnamon

1/4t nutmeg

Check out the seasonings and spices.  These could be switched up if you’d like, but I love this combination for sweet potatoes!

First preheat the oven to 400 then wash and scrub sweet potatoes, then slice thinly and evenly.  A mandolin would work well for this, but since I didn’t have one, I resorted to cutting them by hand with a knife.  I tried a potato peeler for really thin slices, but it only worked on the skinny ends of the potato, so I used the knife primarily.  This didn’t result in the most perfectly even cut, but I was pretty close.

You’ll want the slices as even as possible so they cook as evenly as possible.

Once the potatoes are cut, combine them with oil in a bowl or plastic bag and toss well to coat.

I used my fingers to ensure every piece had a light coat of oil on them.

Then, in the same bowl or bag add the spices and toss well to evenly coat.

Place slices evenly onto a baking sheet.

Bake for 10-12 minutes, then flip them over.  This is how they look after about 10 minutes.

Continue baking for 10-12 additional minutes.  Some pieces were crispy after that, others needed up to an additional 10 minutes.  When they’re finished, they’re delicious hot or room temperature!  Store in a covered container for a few days – if they last that long.

Yellow River Smoothie

Hubby and I were recently on vacation in sunny Central America.  At one of the resorts we stayed at we were introduced to this addictive smoothie!  It’s perfect for those last few days by the pool that Summer will give us.  It’s a nice refreshing treat as a healthy dessert, too!

Yellow River Smoothie

serves 1-2

juice from 1.5 mangoes

1/2 pineapple cut into frozen chunks

1 banana

ice optional

I used all fresh fruit, juicing the mango just before this photo was snapped.  I also cut fresh pineapple and froze it earlier in the day.  I have made this before with mango & pineapple juice with ice and the ice watered it down too much.  Since I didn’t add any extra sugar (the fruit is sugary enough) I didn’t want to fruit to have to compete with ice watering it down.  This time I froze the pineapple and it worked perfectly!

Combine all ingredients in a blender.

Since there is not a lot of liquid in this recipe, and I used a regular blender, I had to stop midway through and mix the top chunks in with a wooden spoon then resume blending.  And that’s it!

Enjoy while summer is still here!

Berries and Cream

Happy Labor Day!  If you’re able to be off and enjoy the holiday, yay!  If you have a party to attend, I’ve got some recipes for you – or even if you’re just chilling at home, you still gotta eat.  If you’re going to a USA themed party, check out my Red, White, & Blue Mini Trifles and Red & White Sweet & Salty Popcorn.  If you just want a fun snack to bring – or keep for yourself – try your hand at one of my simplest, go to recipes.

This recipe is truly so easy.  It is often my go to when people are over for dinner because it is a light, sweet addition to nearly any style of food.  I love that it only requires a few ingredients, and less than 10 minutes to whip up – literally!

Berries and Cream

serves 2

2C berries – I like tart berries for this recipe such as the blackberries and raspberries I used

2C heavy whipping cream

1/4C sugar

1/4t vanilla extract

1 lemon

First, chill your metal mixing bowl and whisk in the freezer for about 15 minutes to chill.  As I learned recently from Kellie, this causes the whipped cream to be lighter since it maintains a chilled temperature throughout the whipping process.  The cream can easily be whipped by hand with a regular whisk, but I chose to use my Kitchenaid for this recipe.  Look how frosty it is!

While the bowl and whisk are freezing, wash all the berries and set them aside to dry. Then, zest the lemon.  I have had this recipe with lemon curd folded into the cream which is just as delightful – and significantly more lemony.  But the zest is a nice light touch that compliments the berries well.

Once the bowl and whisk are sufficiently chilled, pour in the cream and begin to whip on a low setting, if using a hand beater or Kitchenaid, or medium by hand.

Once the cream has begun to be whipped, slowly add in the vanilla,
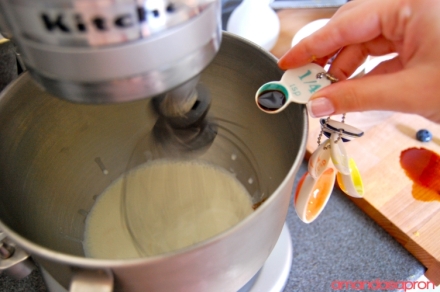
sugar, and lemon zest.

Whip for several minutes until incorporated, or until the whip cream can stand on it’s own in nice peaks that curl over.

Be careful not to over whip – you do not want to create butter!  Look at this goodness.

Prepare berries in whatever bowls you’ll be serving them in.


Oh, blackberries!  Good thing I love you!

Serve cream over berries immediately. I chose to add a little more lemon zest on top for presentation.  So easy!
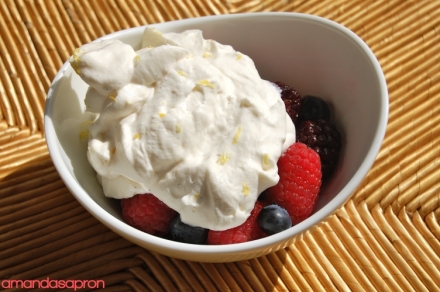
My food wanted to model.  The camera loves it!